Fix QuickBooks Event ID 4 Error with Pro-recommended Solutions

QuickBooks Event id 4 error is a common occurrence arising when users attempt to launch QB Integration manager and use the app smoothly. The error interrupts the process and leads to significant troubles for the users. So let’s understand what the issue entails and how you can fix it effectively.
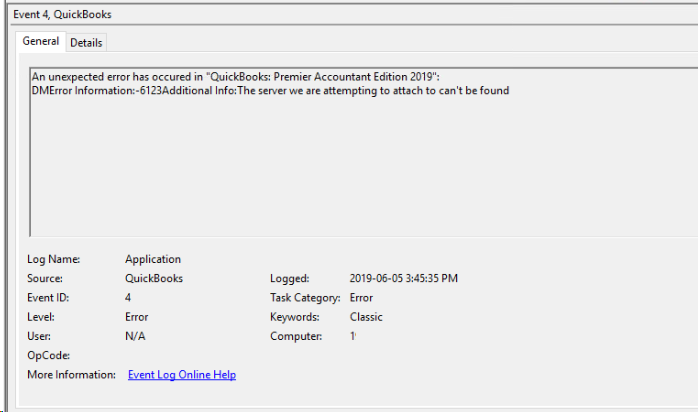
When it comes to accounting, QuickBooks is known as the best accounting software that has been adopted by numerous small to mid-sized businesses. Unlike other windows, software QuickBooks also encounters errors during certain operations, which can be resolved quickly with as little downtime as possible. One such error is the Event id 4 error that arises when the user launches the (QBi) QuickBooks Integration Manager tool. The error message” “Integration Manager could not connect to QuickBooks. Please make sure that it is open” is displayed to the user. Another error message that you may notice is “QuickBooks Event ID 4 – An unexpected error has occurred” “QuickBooks: Returning NULL QBWinInstance Handle” under Windows Event Viewer. This Windows-specific error can also affect QuickBooks installed on the server.
We have tried our best to help you resolve the issue manually, but with sensitive company data on QuickBooks, are you ready to risk it? Inability to troubleshoot Event id 4 Error can cause permanent damage to the company file. Instead, it is recommended to take professional help available at +1- 855 738 2784

What is Event id 4 QuickBooks Error?
Event id 4 QuickBooks error emerges while attempting to access the QuickBooks Integration Manager. Since Windows components are critical to resolving this issue, any damage to these tools can hinder the program’s performance. The error Event ID 4 will flash on the screen when Windows components suffer from damage. It is a Windows-specific error that affects QuickBooks functioning on the server.
Primarily, this error is a .NET Framework 4.0 SP1 problem. Some instances of the error message are given below:
An unexpected error has occurred in “QuickBooks: Desktop Pro 2020”:
WPR: calling ABORT_CLOSE
An unexpected error has occurred in “QuickBooks: Premier Edition 2020”:
WPR: SetNameDriverAndPort call failed
An unexpected error has occurred in “QuickBooks: Premier Accountant Edition 2020”:
WPR: validation failed
An unexpected error has occurred in “QuickBooks: Point of Sale 2020”:
WPR: OpenPrinter call failed
An unexpected error has occurred in “Intuit QuickBooks Enterprise Solutions: Manufacturing and Wholesale 19.0”:
DMError Information:-6123 Additional Info: The server we are attempting to attach to can’t be found
An unexpected error has occurred in “Intuit QuickBooks Enterprise Solutions: Manufacturing and Wholesale 19.0”:
DB error -210 ErrorMessage:’User ‘456964656e’ has the row in ‘LOCKS’ locked’ from file:’src\sadbsess.cpp’ at line 4727 from function:’SADBSession::AcquireLock’
An unexpected error has occurred in “QuickBooks”: mainframe must be already created by now as this dll is demand loaded
The error may also arise when users attempt to install QuickBooks on a Windows server or move it to a new computer. You may experience data loss if the issue isn’t resolved timely. So, let’s look into the numerous reasons for the error and ways to fix them.
What Causes Integration Manager Error in QuickBooks?
Several Windows components work together to run any application on your computer smoothly without generating any errors. Still, when these supporting components do not function properly, QuickBooks Desktop encounters errors. You might get an Event id 4 error if you have installed .Net Framework 4.0 or any previous version on your computer running on Windows 7 Service Pack 1.
Other possible triggers of WPR: calling abort_close, are as follows:
- A damaged or corrupted QB company file can cause an error.
- A malicious malware or virus attack may be responsible for the issue.
- If the QuickBooks installation is partial or corrupt, an error may arise.
- The Windows Registry may face possible errors, triggering the event ID 4 QuickBooks error.
- When any background running application accidentally deletes an essential QB-related file, the error event ID 4 emerges.
Further, in this article, we have listed detailed and step-by-step methods to resolve QuickBooks Integration Manager Error. But before that, let’s look into the identification signs exhibited by the error.
Signs of QuickBooks Event id 4 Error
Here’s what users experience when they encounter the QuickBooks exception saving the cache error:
- You’ll experience the QuickBooks program lagging, freezing, and crashing while running.
- One of the error messages will display on the screen.
- The system will run extremely slow, and mouse and keyboard commands won’t input correctly.
- You may face Windows OS crashing, freezing, and functioning slowly.
- Any active Windows app may crash while running as the error pops up on the screen.
- QB doesn’t operate efficiently due to the error.
It’s crucial to implement adequate troubleshooting solutions to rectify the issue quickly. So, let’s dive into the troubleshooting section of this blog.
Recommended To Read – How To Fix QuickBooks Error 15276
Troubleshooting Steps to Fix Event id 4 Error in QuickBooks:
Now that we have enough insights into QuickBooks error 4, let’s look into the troubleshooting techniques. Although you need to spend time and effort, it’ll be worth it through the detailed and sequential resolution methods:
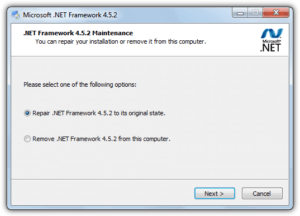
Troubleshooting Step 1: Reinstall .Net Framework on Windows
Incompatibility of Microsoft .NET Framework with the third-party applications is one of the most common reasons for getting errors and warnings in the Windows event log. Therefore, manually reinstalling and updating .NET Framework resolves the error often.
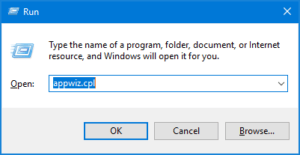
- Press Windows key+ letter R simultaneously on your keyboard to open Run Window.
- Type command Appwiz.cpl and press Enter.
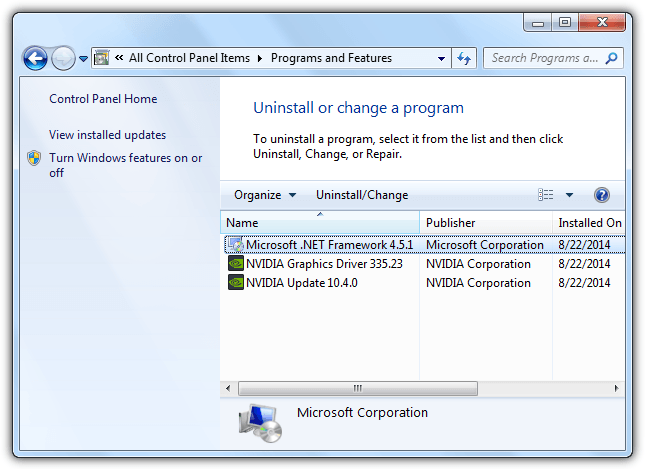
- Under the Programs and Features list, locate and click Microsoft .Net Framework.
- Select Uninstall/Change, and after the uninstallation process completes, restart your computer.
- Now navigate back to the Programs and Features window, and from the left side panel, click Add / Remove Windows Features.
- From the list of programs, click Microsoft .Net Framework to expand.
- Checkmark the first & second checkboxes and select OK.
- Follow the instructions as they appear on the screen to completely uninstall the MS framework installation.
- After removing the previous installation, download and install the latest version of Microsoft .Net Framework 4.8,
- Finally, restart Windows and open QuickBooks Integration Manager once again.
NOTE: In case if you are unable to uninstall .NET Framework from your computer, you can use Microsoft Program Install and Uninstall Troubleshooter to fix the issue.
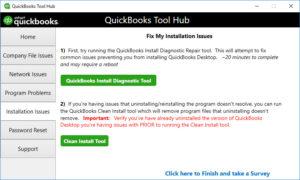
Troubleshooting Step 2: Run QuickBooks Install Diagnostic Tool
Through QuickBooks Tool Hub, you can use one of the most useful tools helpful in resolving installation errors, QuickBooks Install Diagnostic Tool. The following steps can walk you through the process:
- Download QuickBooks Tool Hub, a collection of all the troubleshooting tools QuickBooks has to offer without delay.
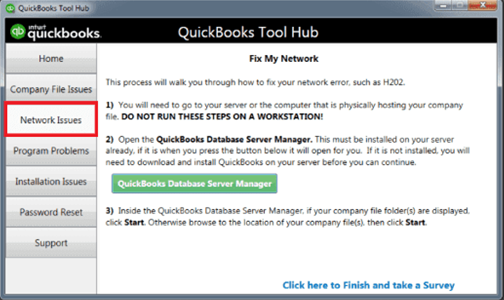
- Navigate to the Installation Issues tab and select QuickBooks Install Diagnostic Tool.
- If you have manually downloaded the tool then, open the downloads of your computer and double-click the QB Install Diagnostic file.
- Follow the instructions given on the screen to complete the installation.
- Exit all the running applications on Windows.
- Finally, run the QB Install tool and restart your computer.
NOTE: Microsoft also suggests running Windows Registry Checker Tool (Scanreg.exe) to eliminate event id errors in Windows. Here you can find a detailed article to install and run Windows Registry Checker Tool.
Troubleshooting Step 3: Reinstall QuickBooks using Clean Install Tool
Before performing this step, make sure to take a backup of your company file or contact support at +1- 855 738 2784 for help, as running this tool will delete all of your QuickBooks data from the computer.
- To begin with, open QuickBooks Tool Hub that you have installed earlier in the previous step.
- Hit the Installation Issues tab and select Clean Install Tool.
- Click I Accept and select the QuickBooks version you are using.
- Finally, click Continue and then select OK.
IMPORTANT: As a final troubleshooting step, you can try installing the .NET Framework application that comes with the QuickBooks installation CD. Insert the installation disk into the CD drive and open the installation disk using the Explore option. Now search and run the ThirdPartyDotNET20dotnetfx20.exe file from the disk. Follow the on-screen instructions to install the most compatible version of the .NET Framework with your QuickBooks Desktop version.
Troubleshooting Step 4: Run QuickBooks File Doctor
In rare instances, possible company file corruption can also cause error messages to appear in the Windows event log file. Fortunately, even the major errors with the company file can quickly be resolved using QuickBooks File Doctor. Follow our article on repairing company file errors using QuickBooks File Doctor for detailed instructions.
Troubleshooting Step 5: Undertake manual procedure to fix .NET Framework
You may need to fix the .NET framework manually through the following actions when QuickBooks event ID 4 unexpected error 5 strikes the system:
- Exit all the active programs. You can also terminate the QuickBooks processes from the Task Manager. It’s possible through the following steps:
- Launch the Task Manager by pressing Ctrl + Shift + Delete keys.
- Head to the Processes tab.
- Locate QBW32.exe, QBupdate.exe, and QBDBMgrn.exe services.
- Right-click each of them and opt for the End Task/ Process option.
- End other running apps this way too.
- Head to the Windows Start menu and type Control Panel.
- Tap Programs and Features in the Control Panel.
- Opt for the Uninstall a Program option.
- Now, choose to Turn Windows Features On or Off.
- Look for .NET Framework from the program list.
- Verify the settings for both .NET Framework 4.5 or over and .NET Framework 3.5 SP1.
Verify the Settings for .NET Framework 4.5 or more
The following steps should be taken when the .NET Framework 4.5 or later is unchecked:
- Tickmark the .NET Framework 4.5 box to enable it.
- Tap OK to apply these changes.
- Reboot your device.
The following steps are necessary when the box is already marked:
- Unmark the .NET Framework 4.5 or later box to disable it.
- Hit OK to implement the modifications.
- Reboot your device.
- Log into Windows again and follow the steps mentioned above.
Verify the Settings for .NET Framework 3.5 SP1
When the .NET Framework 3.5 SP1 is unmarked, take the following steps:
- Mark the .NET Framework 3.5 SP1 box and enable it.
- Hit OK to confirm the modifications.
- Restart your system.
On the other hand, if the .NET Framework 3.5 SP1 is already marked, do the following:
- Disable the .NET Framework 3.5 SP1 box by unchecking the box.
- Implement the alterations by hitting OK.
- Restart your device.
- Sign back into Windows and execute the steps given above.
Read Also – What is QuickBooks Data Migration Services
Troubleshooting Step 6: Use Quick Fix My Program
QuickBooks Tool Hub contains various utilities that help rectify QuickBooks Event id 4. One of the components that you can use is the Quick Fix My Program. The steps to use this tool are as follows:
- Begin by downloading the QB Tool Hub from the official Intuit website.
- Save the download file in the default downloads folder or Browse to find a new location.
- After finishing the download successfully, access the download location and double-tap the QuickBooksToolHub.exe file.
- The installation wizards will appear on the screen. Respond to them accordingly and agree to the terms and conditions.
- After successful installation and setup, double-tap the QuickBooks Tool Hub icon on the desktop.
- Open it and head to the Program Problems section in the tool hub.
- Here, select Quick Fix My Program and resolve performance issues and lags caused by the event id 4 error QuickBooks.
Troubleshooting Step 7: Reinstall QuickBooks Desktop
- Tap the Windows icon on the keyboard to access the Start menu.
- Type Control Panel in the Start menu’s search field.
- Enter the results and open the Control Panel window.
- Opt for the Programs and Features tab.
- Select the Uninstall a Program option.
- Find QuickBooks Desktop from the application list.
- Tap the Remove a Program option and execute the wizards to delete the app from the system.
- Once done, use the clean install tool from QuickBooks Tool Hub.
- Now, reinstall QuickBooks from official sources or through a safe CD.
- Accept the terms and conditions while installing.
- Enter the necessary details.
- Finish installing QuickBooks successfully in the system.
Alternatively, you can delete QuickBooks through Settings:
- Tap the search icon in the Start menu.
- Look for Settings (gear icon).
- Click it and head to the Apps section.
- Further, click the Apps and features option.
- Look for QuickBooks Desktop manually or through the search space.
- After finding the program, tap the three dots at the end of the program name.
- Hit the Uninstall option.
- Execute the wizards for successful uninstallation.
- Clear the space through the clean install tool and delete the junk files and folders.
- Reinstall safely through official sources.
Troubleshooting Step 8: Fix the Registry Editor
You should check your registry editor entries and see if the fault lies there. If it does, you’ll need to rectify them before proceeding with other troubleshooting methods for QuickBooks event id 4. Resolve the registry editor entry-related issues as follows:
- Tap the Start button or press the Windows + R keys simultaneously to launch the Run window.
- Type regedit in the run window when you see the search space. Hit Enter.
- Browse through the installed programs and delete the corresponding keys. There’s a strong possibility of having a key related to the error.
- Look for this file: HKEY_LOCAL_MACHINE\SOFTWARE\Policies\Microsoft\Windows\Installer
Here, look for keys (find) and delete the names of the apps already uninstalled on the device. Essentially, we are deleting the duplicate keys related to the error. The easy steps for the same are as follows:- Press Ctrl and F keys together on the keyboard to open the Find box.
- Type the app’s name in the Find box (QuickBooks), then Enter. If the text search matches a result, the resultant key will get highlighted.
- Now, you need to delete the key.
- Press the F3 key on the keyboard to alternate between keys and delete them.
- You would also need to delete any unwanted startup components along with these keys. The steps involved in this quick process are:
- In the Registry Editor window, head to This PC (My Computer).
- Follow the path to the folder: HKEY_LOCAL_ MACHINE > Software > Microsoft > Windows > Current Version.
- You’ll get a list of executable files on startup as you press the Run button.
- Delete the apps per your preferences and requirements.
- Also, check the right-side window named Disable MSI. If its value is different than zero, bring it back to zero.
Hopefully, you won’t see the event id 4 error after performing this method.
You May Also Like To Read – Getting QuickBooks Error 15240
Troubleshooting Step 9: Repair the QuickBooks Application
You may need to fix your QuickBooks application to resolve its problems. You can do so through the following actions:
- Head to the Start menu and type Control Panel.
- Open the Control Panel window and click the Programs and Features option.
- After tapping the Programs and Features tab, choose the QuickBooks Program from the application list.
- Further, click Uninstall/ Repair a program.
- Execute the steps to repair QuickBooks installation.
- Finish the procedure, and you’re good to go. Check if you still get the QuickBooks event id 4 error.
As an alternative option, you can use your system’s settings for the same results.
- Click the Search button on the Taskbar.
- Tap the Settings icon (gear icon) on the screen.
- From the settings window, tap the Apps section.
- Further, choose Apps and Features.
- Locate QuickBooks Desktop from the list of programs on the screen. You can search for it by scanning or filtering the results.
- Once you find it, tap the three dots at the end of its name.
- Click the Modify option here.
- Undertake the steps to repair the application.
- Finish the process, and you can return to using QB error-free.
Troubleshooting Step 10: Use System File Checker
The System File Checker scan can help users rectify issues with the system files. The scan is available through the following steps:
- Access the Run window through the Start menu or by pressing the Windows icon and R keys together.
- Type CMD in the search space.
- Hit Enter and view the Command Prompt result.
- Before opening the Command Prompt window, hold Ctrl and Shift keys simultaneously.
- Then, double-click the Command Prompt icon.
- The CMD window will open with admin privileges and appear as a blank black window with a moving cursor.
- Type SFC/Scannow in the CMD window and hit Enter.
- The System File Checker scan will start processing and fixing your damaged system files. Once the scanning is over, you can restart your system.
- Return to QuickBooks Desktop and undertake the same processes where you were getting the QuickBooks Event id 4 error. Check if you still get it.
Troubleshooting Step 11: Switch to Selective Startup
If third-party interferences and programs running in the backgrounding are causing QuickBooks event id 4 error, you should switch to the selective startup mode. This mode will eliminate any interruptions, allowing you to fulfill your operations seamlessly. Here’s how to switch to a selective startup:
- Tap the Windows + R keys together to access the Run command.
- In the Run window, type msconfig and press Enter.
- Hit the Selective Startup option to switch to the General tab.
- Then, opt for the Hide all Microsoft Services box.
- Further, choose Windows Installer from the list of services in the services tab.
- Then, unmark the Hide all Microsoft services option.
- After applying these services, you need to restart your system.
- Once the selective startup switch is successful, you should use QuickBooks per your wish.
- After the switch is successful and your mission in QB is accomplished, it’s time to return to normal mode.
- To do so, open the Run command by pressing Windows + R keys.
- Type msconfig in the run window.
- Hit Enter and opt for normal mode.
- Reboot your device and reopen QuickBooks.
- See if the error persists.
Troubleshooting Step 12: Disable the Antivirus System
You should turn your antivirus off if it is restricting QuickBooks from functioning properly. The steps involved in disabling the antivirus system are as follows:
- Right-tap the antivirus icon in the taskbar.
- View the options on the screen and hit the Disable option.
- After disabling it, try opening QuickBooks again. See if the error persists.
Troubleshooting Step 13: Clear the junk out of your files
Ensure to clear the system junk to make way for QuickBooks to run seamlessly. The steps involved in this process are as follows:
- Open My Computer from the Desktop. It can be This PC also depending on your Windows OS.
- Head to the C drive and right-tap it.
- Tap the Properties option.
- Here, click the Disk Cleanup option.
- You’ll find options to clean system files, temporary folders, and junk.
- Delete everything and restart your device.
- Return to opening QuickBooks and rectify the error.
Hopefully, these steps will resolve the QuickBooks event id 4 error.
NOTE: If none of the solutions mentioned above helped you resolve the error, this indicates a possible system infection caused by a virus or malware. An ideal solution to tackle such a situation is to install and run reputed antivirus software to eliminate any possible infections that might be causing Event id 4 error in different versions of QuickBooks.
Following the troubleshooting steps in the given order will resolve QuickBooks Event id 4 Error. We suggest you call Helpline Number +1- 855 738 2784 if you still face the same error with QuickBooks Integration Manager. Our certified experts are well trained in resolving such errors in the application and will guide you through each step of the troubleshooting method for a quick resolution.
FAQs
How to resolve QuickBooks event id 4 error due to virus or malware issues?
If you are facing QuickBooks event id 4 due to virus or malware attacks, you need to rectify the problem by running in-depth scans. Have a reliable antivirus security software Installed on your device. Use it to run complete scans and resolve any virus or malicious attacks causing problems.
How to allow Windows firewall through port exceptions?
The Windows Firewall may be restricting QuickBooks, causing QuickBooks Event id 4 error. Allow the program through the firewall as follows:
- Search for Windows Firewall on the start menu and open the results.
- Tap Advanced settings.
- Right-click Inbound Rules. Hit the New Rule option.
- Tap Port and hit Next.
- Ensure to select TCP.
- Enter the specific ports needed for your QB version in the specific local ports field.
- Tap Next after entering the port number.
- Choose to allow the connection and select Next.
- Ensure to mark all profiles if prompted. Tap next.
- Create and name a rule.
- Tap Finish once you’re done.
Similar steps are to be followed to add QuickBooks programs through firewall exceptions. Follow the same steps till number 3. Then, choose Program, followed by This Program path. The remaining steps will be similar to Steps 8-11.
Related Posts –
Let’s Tackle QuickBooks Error 15241 Like a Pro
Troubleshoot QuickBooks Error 3140 with Pro-recommended Methods
Fix QuickBooks Error 6069 with Experts Guide
QuickBooks Won’t Open? Here’s the Key to Solving it!
Fix QuickBooks Error OL 301 and QuickBooks Error OL 393 Banking Error